Setting up Apache Kibble
Understanding the Components
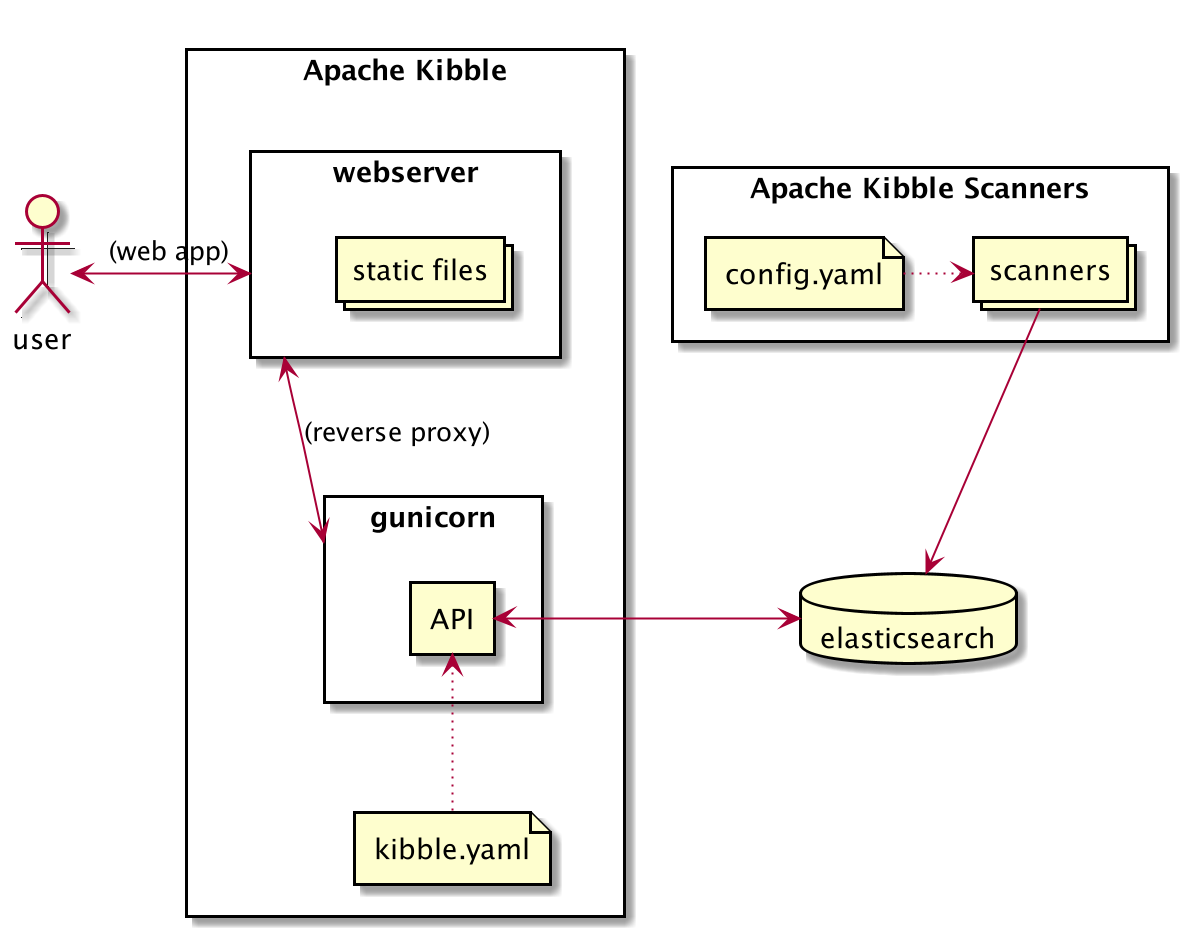
Kibble consists of three major components:
- web application - this is the user facing part of Apache Kibble. Via this
- ui users can create organizations, configure scanners and most importantly view and analyze the data.
- scanners - as the name suggest are application designed to work
- with a specific type of resource (a git repo, a mailing list, a JIRA instance etc) and push compiled data objects to the Kibble Server. Some resources only have one scanner plugin, while others may have multiple plugins capable of dealing with specific aspects of a resource.
- database - an instance of ElasticSearch used by both web application and
- scanners to share the information.
The following diagram shows Kibble architecture:
Component Requirements
Server Component
The Kibble Server is a hub for scanners, and as such, is only ever needed on one machine. It is recommended that, for large instances of kibble, you place the application on a machine or VM with sufficient resources to handle the database load and memory requirements.
As a rule of thumb, the Server does not require a lot of disk space (enough to hold the compiled database), but it does require CPU and RAM. The scanners require more disk space, but can operate with limited CPU and RAM.
As an example, let us examine the Apache Kibble demo instance:
- 100 sources (git repos, mailing lists, bug trackers and so on)
- 3,5 million source objects currently (commits, emails, tickets etc)
- 10 concurrent users (actual people uing the web UI)
The recommended minimal specs for the Server component on an instance of this size would be approximately 4-8GB RAM, 4 cores and at least 10GB disk space. As this is a centralized component, you will want to spec this to be able to efficiently deal with the entire database in memory for best performance.
Scanner Component
The scanner components can either consist of one instance, or be spread out in a clustered setup. Thus, the requirements can be spread out on multiple machines or VMs. Scanners will auto-adjust the scanning speed to match the number of CPU cores available to it; a scanner with two cores available will run two simultaneous jobs, whereas a scanner with eight cores will run eight simultaneous jobs to speed up processing. A scanner will typically require somewhere between 512 and 1GB of memory, and thus can safely run on a VM with 2GB memory (or less).
Source Code Location
Apache Kibble does not currently have any releases. You are however welcome to try out the development version.
For the time being, we recommend that you use the main branch for
testing Kibble. All source code can be found in our repository at:
https://github.com/apache/kibble
Installing Kibble
Pre-requisites
Before you install the Kibble, please ensure you have the following components installed and set up:
- Python 3.8
- git binaries (GPL License)
- cloc version 1.76 or later (GPL License)
- An ElasticSearch instance, version 6.x or newer (5.x is supported for existing databases, but not for new setups). Does not have to be on the same machine, but it may help speed up processing.
- A web server of your choice (Apache HTTP Server, NGINX, lighttp etc)
Configuring and Priming the Kibble Instance
Once you have the components installed and Kibble downloaded, you will need to prime the ElasticSearch instance and create a configuration file.
To install kibble do the following
git clone https://github.com/apache/kibble.git
cd kibble
pip install .
As a good practice it is recommended to use virtual environment for installation.
Once kibble is installed you may wish to adjust the kibble.ini configuration
file, especially the elasticsearch section which is required to connect to database.
Then you can run the following command to configure the database and create initial administrator account for the UI:
kibble setup --autoadmin --skiponexist
Setting up the Web UI
Once you have finished the initial setup, you will need to enable the web UI. Kibble is built as a WSGI application, and as such you can use mod_wsgi for apache, or proxy to Gunicorn. In this example, we will be using the Apache HTTP Server and proxy to Gunicorn:
- Make sure you have mod_proxy and mod_proxy_http loaded (on debian/ubuntu, you would run: a2enmod proxy_http)
- Set up a virtual host in Apache:
<VirtualHost *:80>
   # Set this to your domain, or add kibble.localhost to /etc/hosts
   ServerName kibble.localhost
   DocumentRoot /var/www/kibble/ui/
   # Proxy to gunicorn for /api/ below:
   ProxyPass /api/ http://localhost:8000/api/
</VirtualHost>
- Launch gunicorn as a daemon on port 8000 (if your distro calls gunicorn for Python3 gunicorn3, make sure you use that instead):
cd /var/www/kibble/api/
gunicorn -w 10 -b 127.0.0.1:8000 -t 120 -D kibble.api.handler:application
Once httpd is (re)started, you should be able to browse to your new Kibble instance.
Configuring a Scanners
Scanners are configured via kibble.ini configuration file.
Remember that the scanner must have enough disk space to fully store any resources you may be scanning. If you are scanning a large git repository, the scanner should have sufficient disk space to store it locally.
If you plan to make use of the optional text analysis features of Kibble, you should also configure the API service you will be using (Watson/Azure/picoAPI etc).
Balancing Load Across Machines
If you wish to spread out the analysis load over several machines/VMs,
you can do so by specifying a scanner.balance on each node. The balance
directive uses the syntax X/Y, where Y is the total number of nodes in
your scanner cluster, and X is the ID of the current scanner. Thus, if
you have decided to use four machines for scanning, the first would have
a balance of 1/4, the next would be 2/4, then 3/4 and finally 4/4 on the
last machine. This will balance the load and storage requirements evenly
across all machines.
Running a Scan
Once you have both scanners and the data server set up, you can begin scanning resources for data. Please refer to Configuring Data Sources for how to set up various resources for scanning via the Web UI.
Scans can be initiated manually, but you may want to set up a cron job to handle daily scans of resources. To start a scan on a scanner machine, run the following:
kibble scan
This will load all plugins and use them in a sensible order on each resource that matches the appropriate type. The collected data will be pushed to the main data server and be available for visualizations instantly.
It may be worth your while to run the scanner inside a timer wrapper,
as such: time kibble scan in order to gauge the
amount of time a scan will take, and adjusting your cron jobs to match
this.
Docker Image
If you want to spin up a development instance of Apache Kibble you can do:
docker-compose -f docker-compose-dev.yaml run kibble setup --autoadmin --skiponexist
docker-compose -f docker-compose-dev.yaml up ui
The ui should be available under http://0.0.0.0:8000 or http://localhost:8000.
To log in you can use the dummy admin account admin@kibble and password kibbleAdmin.
You can also start only the API server:
docker-compose -f docker-compose-dev.yaml up api
To trigger scanners run:
docker-compose -f docker-compose-dev.yaml run kibble scan